

Design Your Own Tower Defense Game
Update note: This tutorial has been updated to Unity 2017.1 by Jeff Fisher. The original tutorial was written by Barbara Reichart.
Tower defense games are incredibly popular, and no wonder — few things are more satisfying than watching your defense obliterate evil invaders! In this two-part tutorial, you build a tower defense game with Unity!
You'll learn how to…
- Create waves of enemies
- Make them follow waypoints
- Build and upgrade towers and let them reduce your enemies to pixels
At the end, you'll have a framework for this genre that you can expand upon!
Note: You need to know Unity basics, like how to add game assets and components, understand prefabs and know some basic C#. To learn those things I recommend completing the Unity tutorials by Sean Duffy or the Beginning C# with Unity series by Brian Moakley.
I'm using the OS X version of Unity, but this tutorial works on Windows too.
A View from the Ivory Tower
In this tutorial, you build a tower defense game, where enemies — little bugs — crawl towards a cookie that belongs to you and your minions, which are of course monsters! You can place and upgrade monsters at strategic points for a bit of gold.
The player must kill the bugs before they feast on your cookie. Each wave of enemies is successively harder to defeat. The game ends when you survive all waves (Victory!) or when five enemies reach the cookie. (Defeat!).
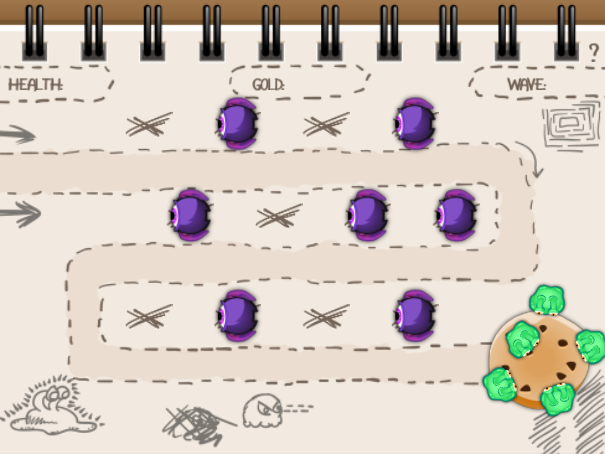
Here's a screenshot of the finished game:

Monsters Unite! Protect the cookie!
Getting Started
If you don't already have Unity installed, download it from Unity's website.
Also, download this starter project, unzip and open the TowerDefense-Part1-Starter project in Unity.
The starter project includes art and sound assets, along with prebuilt animations and a few helpful scripts. The scripts aren't directly related to tower defense games, so they won't be explained here. However, if you'd like to learn more about creating Unity 2D animations, check out this Unity 2D tutorial.
The project also contains prefabs you'll later expand upon to create characters. Finally, the project includes a scene with its background and user interface set up.
Open GameScene, found in the folder Scenes, and set your Game view's aspect ratio to 4:3 to ensure the labels line up properly with the background. You should see the following in the Game view:

Credits:
- The art for the project comes from a free art pack by Vicki Wenderlich! You can find more awesome graphics from her at gameartguppy.
- The cool music is from BenSound who has some great soundtracks!
- Thanks goes to Michael Jasper for the impactful camera shake.
Starter project – check!
Assets – check!
The first step towards world domination… ehm, I mean your tower defense game…is done!
X Marks the Spot: Placement
Monsters can only post up at spots marked with an x.
To add these to the scene, drag and drop Images\Objects\Openspot from the Project Browser into the Scene view. For now, position doesn't matter.
With Openspot selected in the Hierarchy, click Add Component in the Inspector and select Box Collider 2D. Unity displays the box collider with a green line in the Scene view. You'll use this collider to detect mouse clicks on that spot.

Unity automatically detects the proper size for the collider. How cool is that?
Following the same steps, add an Audio\Audio Source component to Openspot. Set the Audio Source's AudioClip to tower_place, which you can find in the Audio folder, and deactivate Play On Awake.
You need to create 11 more spots. While it's tempting to repeat all those steps, Unity has a great solution for that: Prefabs!
Drag and drop Openspot from the Hierarchy into the Prefabs folder in the Project Browser. Its name then turns blue in the Hierarchy to show that it's connected to a prefab. Like this:

Now that you have a prefab, you can create as many copies as you need. Just drag and drop Openspot from the Prefabs folder in the Project Browser into the Scene view. Do this 11 times to make a total of 12 Openspot objects in the scene.
Now use the Inspector to set the positions of these 12 Openspot objects to the following coordinates:
- (X:-5.2, Y:3.5, Z:0)
- (X:-2.2, Y:3.5, Z:0)
- (X:0.8, Y:3.5, Z:0)
- (X:3.8, Y:3.5, Z:0)
- (X:-3.8, Y:0.4, Z:0)
- (X:-0.8, Y:0.4, Z:0)
- (X:2.2, Y:0.4, Z:0)
- (X:5.2, Y:0.4, Z:0)
- (X:-5.2, Y:-3.0, Z:0)
- (X:-2.2, Y:-3.0, Z:0)
- (X:0.8, Y:-3.0, Z:0)
- (X:3.8, Y:-3.0, Z:0)
When you're done, your scene should look like this.

Place Monsters
To make placing easier, the project's Prefab folder contains a Monster prefab.

Monster prefab – Ready for use
At this point, it consists of an empty game object with three different sprites and their shooting animations as their children.
Each sprite represents the monster at a different power level. The prefab also contains an Audio Source component, which you'll trigger to play a sound whenever the monster shoots a laser.
You'll now create a script that can place a Monster on an Openspot.
In the Project Browser, select Openspot in the Prefabs folder. In the Inspector, click Add Component, then choose New Script and name it PlaceMonster. Select C Sharp as the Language and click Create and Add. Because you added the script to the Openspot prefab all Openspots in your scene now also have the script attached. Neat!
Double click on the script to open it in your IDE. Then add these two variables:
public GameObject monsterPrefab; private GameObject monster; You'll instantiate a copy of the object stored in monsterPrefab to create a monster, and store it in monster so you can manipulate it during the game.
One Monster Per Location
Add the following method to allow only one monster per location:
private bool CanPlaceMonster() { return monster == null; } In CanPlaceMonster() you check whether the monster variable is still null. If so, it means there is currently no monster here and it's okay to place one.
Now add the following code to actually place a monster when the player clicks this GameObject:
//1 void OnMouseUp() { //2 if (CanPlaceMonster()) { //3 monster = (GameObject) Instantiate(monsterPrefab, transform.position, Quaternion.identity); //4 AudioSource audioSource = gameObject.GetComponent<AudioSource>(); audioSource.PlayOneShot(audioSource.clip); // TODO: Deduct gold } } This code places a monster on mouse click or tap. So how does this work?
- Unity automatically calls
OnMouseUpwhen a player taps a GameObject's physics collider. - When called, this method places a new monster if
CanPlaceMonster()returnstrue. - You create the monster with
Instantiate, a method that creates an instance of a given prefab with the specified position and rotation. In this case, you copymonsterPrefab, give it the current GameObject's position and no rotation, cast the result to aGameObjectand store it inmonster. - Finally, you call
PlayOneShotto play the sound effect attached to the object'sAudioSourcecomponent.
Now your PlaceMonster script can place a new monster, but you still have to specify the prefab.
Use The Right Prefab
Save the file and switch back to Unity.
To assign the monsterPrefab variable, first select Openspot in the Prefabs folder in the project browser.
In the Inspector , click on the circle to the right of the PlaceMonster (Script) component's Monster Prefab field, and select Monster from the dialog that appears.

That's it. Run the scene and build monsters on various x spots with a click or tap.
Success! You can build monsters. However they look like a weird mush because all child sprites of your monster are drawn. You'll fix this next.
Level Up Those Monsters
In the image below, you see how your monsters look increasingly horrifying at higher levels.

It's so fluffy! But if you try to steal its cookie, this monster can turn into a killer.
A script acts as the basis for implementing a leveling system for the monsters. It tracks how powerful the monster should be on each level, and of course, the current level of a monster.
Add this script now.
Select Prefabs/Monster in the Project Browser. Add a new C# script named MonsterData. Open the script in your IDE and add the following code above the MonsterData class.
[System.Serializable] public class MonsterLevel { public int cost; public GameObject visualization; } This creates MonsterLevel. It groups the cost (in gold, which you'll support later) and the visual representation for a specific monster level.
You add [System.Serializable] at the top to make instances of the class editable from the inspector. This allows you to quickly change all values in the Level class — even while the game is running. It's incredibly useful for balancing your game.
Define Monster Levels
In this case, you'll store predefined MonsterLevel in a List<T>.
Why not simply use MonsterLevel[]? Well, you'll need the index of a particular MonsterLevel object several times. While it's not difficult to write code for that, you'll use IndexOf(), which implements the functionality for Lists. No need to reinvent the wheel this time. :]
At the top of MonsterData.cs, add the following using statement:
using System.Collections.Generic; This gives you access to generic data structures, so you can use the List<T> class in your script.
Note: Generics are a powerful part of C#. They allow you to define type-safe data structures without committing to a type. This is practical for container classes like lists and sets. To learn more about generics, have a look at Introduction to C# Generics.
Now add the following variable to MonsterData to store a list of MonsterLevel:
public List<MonsterLevel> levels; Using generics, you ensure the levels List can only ever contain MonsterLevel objects.
Save the file and switch to Unity to configure each stage.
Select Prefabs/Monster in the Project Browser. In the Inspector , you can now see a Levels field in the MonsterData (Script) component. Set its size to 3.
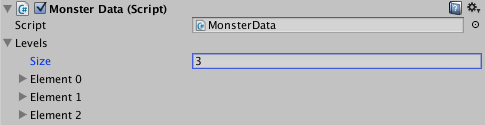
Next, set the cost for each level to the following values:
- Element 0: 200
- Element 1: 110
- Element 2: 120
Now assign the visualization field values.
Expand Prefabs/Monster in the project browser so that you can see its children. Drag and drop the child Monster0 to Element 0's visualization field.
Repeat to assign Monster1 to Element 1 and Monster2 to Element 2. See the following GIF that demonstrates this process:

When you select the Prefabs/Monster, the prefab should look like this:

Definition of the monsters' levels in the inspector.
Define the Current Level
Switch back to MonsterData.cs in your IDE, and add another variable to MonsterData.
private MonsterLevel currentLevel; In the private variable currentLevel you'll store the… wait for it … current level of the monster. I bet you did not see that one coming :]
Now set currentLevel and make it accessible to other scripts. Add the following to MonsterData, along with instance variable declarations:
//1 public MonsterLevel CurrentLevel { //2 get { return currentLevel; } //3 set { currentLevel = value; int currentLevelIndex = levels.IndexOf(currentLevel); GameObject levelVisualization = levels[currentLevelIndex].visualization; for (int i = 0; i < levels.Count; i++) { if (levelVisualization != null) { if (i == currentLevelIndex) { levels[i].visualization.SetActive(true); } else { levels[i].visualization.SetActive(false); } } } } } Quite a bit of C# there, eh? Take it all it turn:
- Define a property for the private variable
currentLevel. With a property defined, you can call just like any other variable: either asCurrentLevel(from inside the class) or asmonster.CurrentLevel(from outside it). You can define custom behavior in a property's getter or setter method, and by supplying only a getter, a setter or both, you can control whether a property is read-only, write-only or read/write. - In the getter, you return the value of
currentLevel. - In the setter, you assign the new value to
currentLevel. Next you get the index of the current level. Finally you iterate over all the levels and set the visualization to active or inactive, depending on thecurrentLevelIndex. This is great because it means that whenever someone setscurrentLevel, the sprite updates automatically. Properties sure do come handy!
Add the following implementation of OnEnable:
void OnEnable() { CurrentLevel = levels[0]; } This sets CurrentLevel upon placement, making sure that it shows only the correct sprite.
Note: It's important to initialize the property in OnEnable instead of OnStart, because you call the order methods when prefabs are instantiated.
OnEnable will be called immediately when you create the prefab (if the prefab was saved in an enabled state), but OnStart isn't called until after the object starts running as part of the scene.
You'll need to check this data before you place a monster, so you initialize it in OnEnable.
Save the file and switch to Unity. Run the project and place monsters; now they display the correct and lowest level sprites.

Upgrade Those Monsters
Switch back to your IDE and add the following method to MonsterData:
public MonsterLevel GetNextLevel() { int currentLevelIndex = levels.IndexOf (currentLevel); int maxLevelIndex = levels.Count - 1; if (currentLevelIndex < maxLevelIndex) { return levels[currentLevelIndex+1]; } else { return null; } } In GetNextLevel you get the index of currentLevel and the index of the highest level provided the monster did not reach the maximal level to return the next level. Otherwise, return null.
You can use this method to figure out whether upgrading the monster is possible.
Add the following method to increase a monster's level:
public void IncreaseLevel() { int currentLevelIndex = levels.IndexOf(currentLevel); if (currentLevelIndex < levels.Count - 1) { CurrentLevel = levels[currentLevelIndex + 1]; } } Here you get the index of the current level, and then you make sure it's not the maximum level by checking if it's smaller than levels.Count - 1. If so, set CurrentLevel to the next level.
Test Upgrade Capability
Save the file and then switch to PlaceMonster.cs in your IDE and add this new method:
private bool CanUpgradeMonster() { if (monster != null) { MonsterData monsterData = monster.GetComponent<MonsterData>(); MonsterLevel nextLevel = monsterData.GetNextLevel(); if (nextLevel != null) { return true; } } return false; } First check whether there is a monster that you can upgrade by checking the monster variable for null. If this is the case, you get the current level of the monster from its MonsterData.
Then you test whether a higher level is available, which is when GetNextLevel() doesn't return null. If up-leveling is possible, you return true, otherwise, you return false.
Enable Upgrading With Gold
To enable the upgrade option, add an else if branch to OnMouseUp:
if (CanPlaceMonster()) { // Your code here stays the same as before } else if (CanUpgradeMonster()) { monster.GetComponent<MonsterData>().IncreaseLevel(); AudioSource audioSource = gameObject.GetComponent<AudioSource>(); audioSource.PlayOneShot(audioSource.clip); // TODO: Deduct gold } Check whether an upgrade is possible with CanUpgradeMonster(). If yes, you access the MonsterData component with GetComponent() and call IncreaseLevel(), which increases the level of the monster. Lastly, you trigger the monster's AudioSource.
Save the file and switch back to Unity. Run the game, place and upgrade as many monsters as you like...for now.

All the monster upgrades
Pay Gold - Game Manager
Right now it's possible to build and upgrade all the monsters immediately, but where's the challenge in that?
Let's drill down into the issue of the gold. The problem with keeping track of it is that you need to share information between different game objects.
The following image shows all the objects that want a piece of the action.
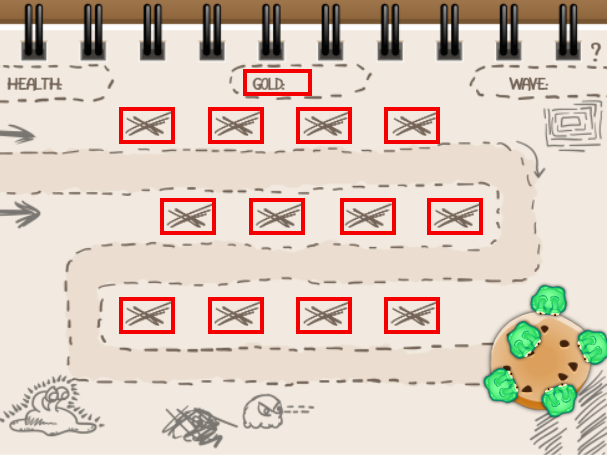
The highlighted game objects all need to know, how much gold the player owns.
You'll use a shared object that's accessible to other objects to store this data.
Right-click in the Hierarchy and select Create Empty. Name the new game object GameManager.
Add a C# script named GameManagerBehavior to GameManager, then open the new script in your IDE. You'll display the player's total gold in a label, so add the following line to the top of the file:
using UnityEngine.UI; This lets you access UI-specific classes like Text, which the project uses for the labels. Now add the following variable to the class:
public Text goldLabel; This will store a reference to the Text component used to display how much gold the player owns.
Now that GameManager knows about the label, how can you ensure the amount of gold stored in your variable and the amount displayed on the label are in sync? You'll create a property.
Add the following code to GameManagerBehavior:
private int gold; public int Gold { get { return gold; } set { gold = value; goldLabel.GetComponent<Text>().text = "GOLD: " + gold; } } Seem familiar? It's similar to the CurrentLevel you defined in Monster. At first, you create a private variable, gold, to store the current gold total. Then you define a property named Gold -- creative, right? -- and implement a getter and setter.
The getter simply returns the value of gold . The setter is more interesting. In addition to setting the variable's value, it also sets the text field on goldLabel to display the new amount of gold.
How generous do you feel? Add the following line to Start() to give the player 1000 gold, or less if you feel miserly:
Gold = 1000; Assign the Label Object to the Script
Save the file and switch to Unity.
In the Hierarchy, select GameManager. In the Inspector , click on the circle to the right of Gold Label. In the Select Text dialog, select the Scene tab and select GoldLabel.

Run the scene and the label displays Gold: 1000.
![]()
Check the Player's "Wallet"
Open PlaceMonster.cs in your IDE, and add the following instance variable:
private GameManagerBehavior gameManager; You'll use gameManager to access the GameManagerBehavior component of the scene's GameManager. To assign it, add the following to Start():
gameManager = GameObject.Find("GameManager").GetComponent<GameManagerBehavior>(); You get the GameObject named GameManager using GameObject.Find(), which returns the first game object it finds with the given name. Then, retrieve its GameManagerBehavior component and store it for later.
Note: You could have accomplished this by setting the field in Unity's editor, or by adding a static method to GameManager that returns a singleton instance from which you could get the GameManagerBehavior.
However, there's a dark horse method in the block above: Find, which is slower at runtime but convenient and ok to use sparingly.
Get the Money!
You don't yet deduct gold, so add this line twice inside OnMouseUp(), replacing each of the comments that read // TODO: Deduct gold:
gameManager.Gold -= monster.GetComponent<MonsterData>().CurrentLevel.cost; Save the file and switch to Unity, upgrade some monsters and watch the Gold readout update. Now you deduct gold, but players can build monsters as long as there is space; they just get into debt.

Infinite credit? Awesome! But you can't allow this. Monsters should only be placed when the player has enough gold.
Require Gold for Monsters
Switch to PlaceMonster.cs in your IDE, and replace the contents of CanPlaceMonster() with the following:
int cost = monsterPrefab.GetComponent<MonsterData>().levels[0].cost; return monster == null && gameManager.Gold >= cost; Retrieve the cost for placing the monster from levels in its MonsterData. You then check that monster is not null and that gameManager.Gold is greater than the cost.
Challenge: Add the check for whether a player has enough gold in CanUpgradeMonster() by yourself.
[spoiler]
Replace this line:
return true; with this one:
return gameManager.Gold >= nextLevel.cost; This checks if the player has more Gold than the cost of the upgrade.
[/spoiler]
Save and run the scene in Unity. Go ahead, just try to place unlimited monsters!

Now you can only build a limited amount of monsters.
Tower Politics: Enemies, Waves and Waypoints
Time to "pave the road" for your enemies. Enemies appear at the first waypoint, move towards the next and repeat until they reach your cookie.
You'll get the enemies marching by:
- Defining a road for the enemies to follow
- Moving the enemy along the road
- Rotating the enemy so it looks forward
Create a Road With Waypoints
Right-click in the Hierarchy and select Create Empty to make a new empty game object. Name it Road, and make sure it's at position (0, 0, 0).
Now, right-click on Road in the hierarchy and create another empty game object as a child of Road. Name it Waypoint0 and set its position to (-12, 2, 0) -- this is where enemies start their assault.
![]()
Create five more waypoints the same way with the following names and positions:
- Waypoint1: (X:7, Y:2, Z:0)
- Waypoint2: (X:7, Y:-1, Z:0)
- Waypoint3: (X:-7.3, Y:-1, Z:0)
- Waypoint4: (X:-7.3, Y:-4.5, Z:0)
- Waypoint5: (X:7, Y:-4.5, Z:0)
The following screenshot highlights the waypoint locations and the resulting path.

Spawn the Enemies
Now to make some enemies to follow the road. The Prefabs folder contains an Enemy prefab. Its position is (-20, 0, 0), so new instances will spawn off screen.
Otherwise, it's set up much like the Monster prefab, with an AudioSource and a child Sprite, and it's a sprite so you can rotate it later without rotating the forthcoming health bar.

Move Monsters Down the Road
Add a new C# script named MoveEnemy to the Prefabs\Enemy prefab. Open the script in your IDE, and add the following variables:
[HideInInspector] public GameObject[] waypoints; private int currentWaypoint = 0; private float lastWaypointSwitchTime; public float speed = 1.0f; waypoints stores a copy of the waypoints in an array, while [HideIninspector] above waypoints ensures you cannot accidentally change the field in the inspector , but you can still access it from other scripts.
currentWaypoint tracks which waypoint the enemy is currently walking away from, and lastWaypointSwitchTime stores the time when the enemy passed over it. Finally, you store the enemy's speed.
Add this line in Start():
lastWaypointSwitchTime = Time.time; This initializes lastWaypointSwitchTime to the current time.
To make the enemy move along the path, add the following code to Update():
// 1 Vector3 startPosition = waypoints [currentWaypoint].transform.position; Vector3 endPosition = waypoints [currentWaypoint + 1].transform.position; // 2 float pathLength = Vector3.Distance (startPosition, endPosition); float totalTimeForPath = pathLength / speed; float currentTimeOnPath = Time.time - lastWaypointSwitchTime; gameObject.transform.position = Vector2.Lerp (startPosition, endPosition, currentTimeOnPath / totalTimeForPath); // 3 if (gameObject.transform.position.Equals(endPosition)) { if (currentWaypoint < waypoints.Length - 2) { // 3.a currentWaypoint++; lastWaypointSwitchTime = Time.time; // TODO: Rotate into move direction } else { // 3.b Destroy(gameObject); AudioSource audioSource = gameObject.GetComponent<AudioSource>(); AudioSource.PlayClipAtPoint(audioSource.clip, transform.position); // TODO: deduct health } } Step by step:
- From the waypoints array, you retrieve the start and end position for the current path segment.
- Calculate the time needed for the whole distance with the formula time = distance / speed, then determine the current time on the path. Using
Vector2.Lerp, you interpolate the current position of the enemy between the segment's start and end positions. - Check whether the enemy has reached the
endPosition. If yes, handle these two possible scenarios: - The enemy is not yet at the last waypoint, so increase
currentWaypointand updatelastWaypointSwitchTime. Later, you'll add code to rotate the enemy so it points in the direction it's moving, too. - The enemy reached the last waypoint, so this destroys it and triggers a sound effect. Later you'll add code to decrease the player's
health, too.
Save the file and switch to Unity.
Give the Enemies A Sense of Direction
In its current state, the enemies don't know the order of the waypoints.
Select Road in the Hierarchy, and add a new C# script named SpawnEnemy. Then open it in your IDE, and add the following variable:
public GameObject[] waypoints; You'll use waypoints to store references to the waypoint in the scene in the proper order.
Save the file and switch to Unity. Select Road in the Hierarchy and set the Size of the Waypoints array to 6.
Drag each of Road's children into the fields, putting Waypoint0 into Element 0, Waypoint1 into Element 1, and so on.

Now you have an array that contains neatly ordered waypoints so there's a path – note that they never retreat; they will die trying to get a sugar fix.

Check That It All Works
Head to SpawnEnemy in your IDE, and add the following variable:
public GameObject testEnemyPrefab; This keeps a reference to the Enemy prefab in testEnemyPrefab.
To create an enemy when the script starts, add the following code to Start():
Instantiate(testEnemyPrefab).GetComponent<MoveEnemy>().waypoints = waypoints; This instantiates a new copy of the prefab stored in testEnemy and assigns it waypoints to follow.
Save the file and switch to Unity. Select Road in the Hierarchy and set its Test Enemy to the Enemy prefab.
Run the project to see the enemy follow the road.

Did you notice they aren't always looking where they're going? Funny! But you're trying to be a professional here, yes? Continue with part two to learn how to get them to put their best faces forward.
Where To Go From Here?
You've gotten a lot done and are well on your way to having your very own tower defense game.
Players can build monsters, but not an unlimited amount, and there's an enemy running towards your cookie. Players have gold and can also upgrade monsters.
Download the result here.
In part two, you'll cover spawning massive waves of enemies and blowing them away. See you in Part Two!
Use the forums below to share your questions, notes, learnings, lightbulb moments and feedback. I look forward to talking with you!
raywenderlich.com Weekly
The raywenderlich.com newsletter is the easiest way to stay up-to-date on everything you need to know as a mobile developer.
Get a weekly digest of our tutorials and courses, and receive a free in-depth email course as a bonus!
Design Your Own Tower Defense Game
Source: https://www.raywenderlich.com/269-how-to-create-a-tower-defense-game-in-unity-part-1
Posted by: demarspriever.blogspot.com
0 Response to "Design Your Own Tower Defense Game"
Post a Comment